{
"$type": "site.standard.document",
"content": {
"$type": "site.standard.content.markdown",
"text": "So...\nYou heard of this framework called React and want to know what all the fuss is about ? Well, wander no more ! Let's go for a spin with ReactJS and build a simple application that will let us see why everyone is talking about it.\n\n## Installing React\n\n### Prerequisites\n\nBefore installing React, make sure you have a correct development environment. I'm not talking about your IDE (Integrated Development Environment) - though I personally prefer Visual Studio Code, but whether or not you have NodeJS installed on your machine. If you do, that's great 👍! If you don't, I'd suggest using [nvm](https://github.com/nvm-sh/nvm) to install the latest LTS (long term support) version; you shouldn't need anything else for this guide.\n\n## Creating a Project\n\nNow that we have a **recent** version on NodeJS, and consequently npm, we can start bootstrapping our new React project. After you get to know better the framework you can have your own starter template, but for today's guide let's just use `create-react-app`. To start a new react project, just open up a terminal and type: `npx create-react-app <folderName>` where `<folderName>` is the name of the folder that will be created with your react project in it.\n**Here's a trick I found recently** : If you insert `.` instead of a folder name (`.` is the current directory), then the project will be instantiated in the current directory, without creating an addition subfolder.\n\nOnce that is done, you can move to that folder and run `npm start` to launch the development server. It should open a browser window to localhost:3000 and you should see the starter page.\n\nCongrats ! You have created your first React project\n\n## Folder Structure\n\n\nThis is the usual folder structure generated by create-react-app\n\nLet's now take a look at some particular files:\n\n- src/App.js : this is the root component all your application will be rendered inside of. If you look at the code inside it, you will see that it's what you've seen when you launched your application\n- src/index.js : this is the file that actually renders the `App` component onto the page by attaching it to a `div` with an id of \"root\".\n- public/index.html : the scheleton of the page your React component will live in: in here you can see the `div` I mentioned above\n\n### To Do\n\nNow that we have had a look at how a React project is structured, we can start creating our To Do app.\n\n**NB: for the sake of brevity, we will have everything happen inside one component. Perhaps in a following article we will advance this project to make it resemble more a real life use case**\n\n#### Task list\n\nThe first step is to create a list of tasks. This list will be updated every time a new items gets added or an item is removed. It will composed of a simple unordered list, with each list item corresponding to a task.\n\n## Creating a component\n\nFor this guide, we will be using functional components and the latest addition to the React arsenal, hooks. To create a functional component you must first import React at the top of the file and create a function that returns some `JSX`.\n\n### What is JSX ?\n\nFrom React's official documentation\n\nConsider this variable declaration:\n\n```js\nconst element = <h1>Hello, world!</h1>\n```\n\nThis funny tag syntax is neither a string nor HTML.\n\nIt is called JSX, and it is a syntax extension to JavaScript. We recommend using it with React to describe what the UI should look like. JSX may remind you of a template language, but it comes with the full power of JavaScript.\n\nYou can learn more [here](https://reactjs.org/docs/introducing-jsx.html)\n\n### Let's get back to the 'task' 🤣 at hand\n\nLet's remove all the code inside the return of the `App` component. It should now look like this:\n\n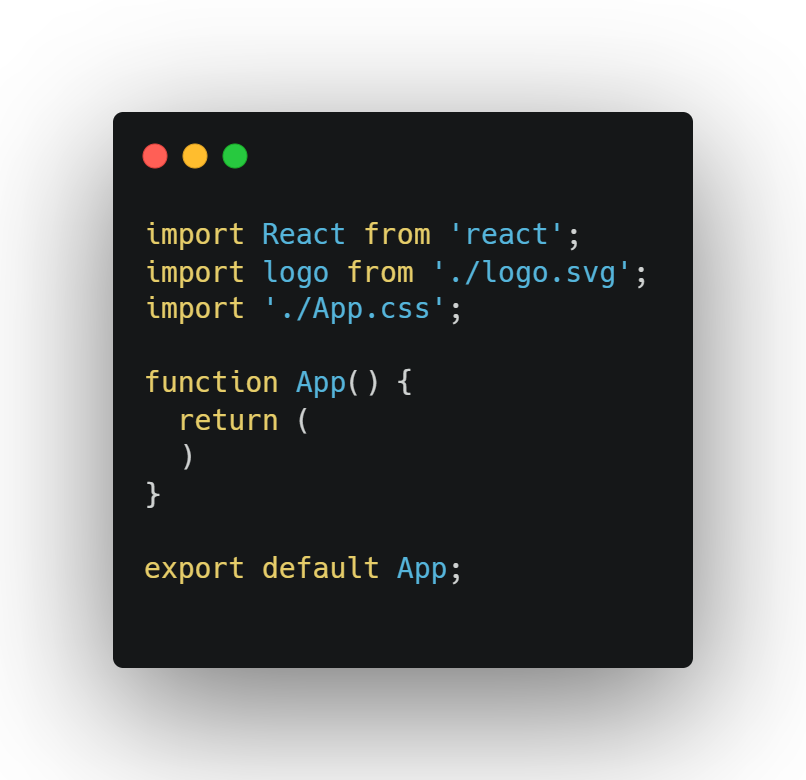\n\nlet's begin by adding a `div` as the root of our component: **All React element must have only one root element** and inside of it let's add our unordered list\n\n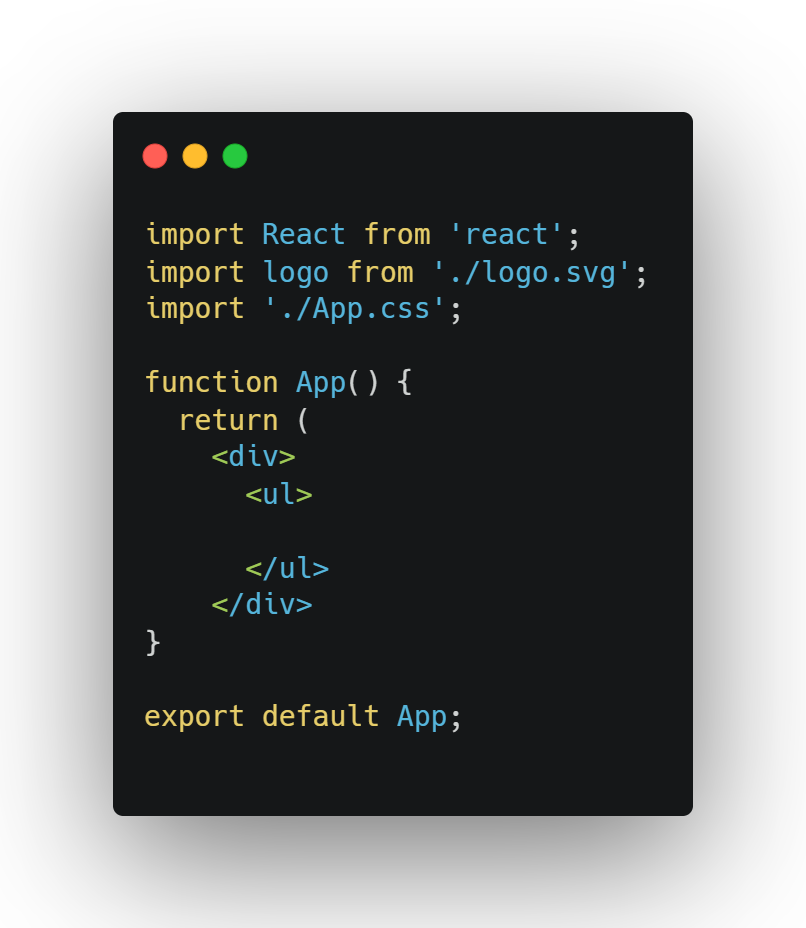\n\n#### Let's display some taks\n\nNow that we have a list element, we need to add elements inside of it. We could add them one by one, but that is not the point of using React. Let's instead declare an array with some data in it:\n\n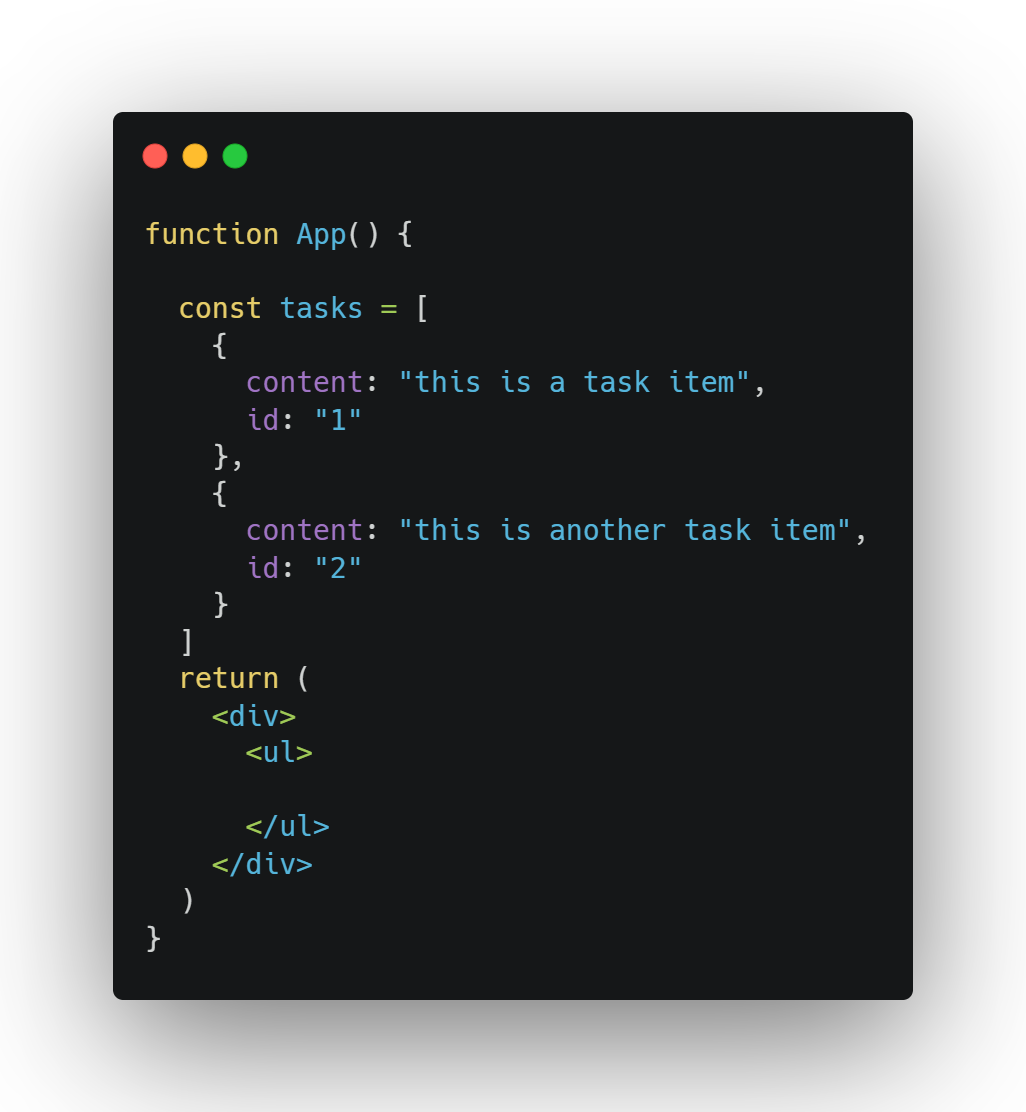\n\nNow that we have some data, all that is left is to display them to the user. Let me introduce you to one of your Javascript bestfriends: **the map function**. It allows us to iterate over an array and return a value for each element (keeping it brief, of course). So, can you guess what we're going to use it for ?\n\n We'll use `map` to display our list items !\n\nso why don't we do just that ?\n\n\n\nIf everything went well, then you should see 2 elements appear on your page.\n\n\n\n#### Adding a task\n\nIn order to add a task, we need to introduce a `Form` tag. Within the form we'll have an `input` and a `button`. Clicking the button will submit the form.\n\n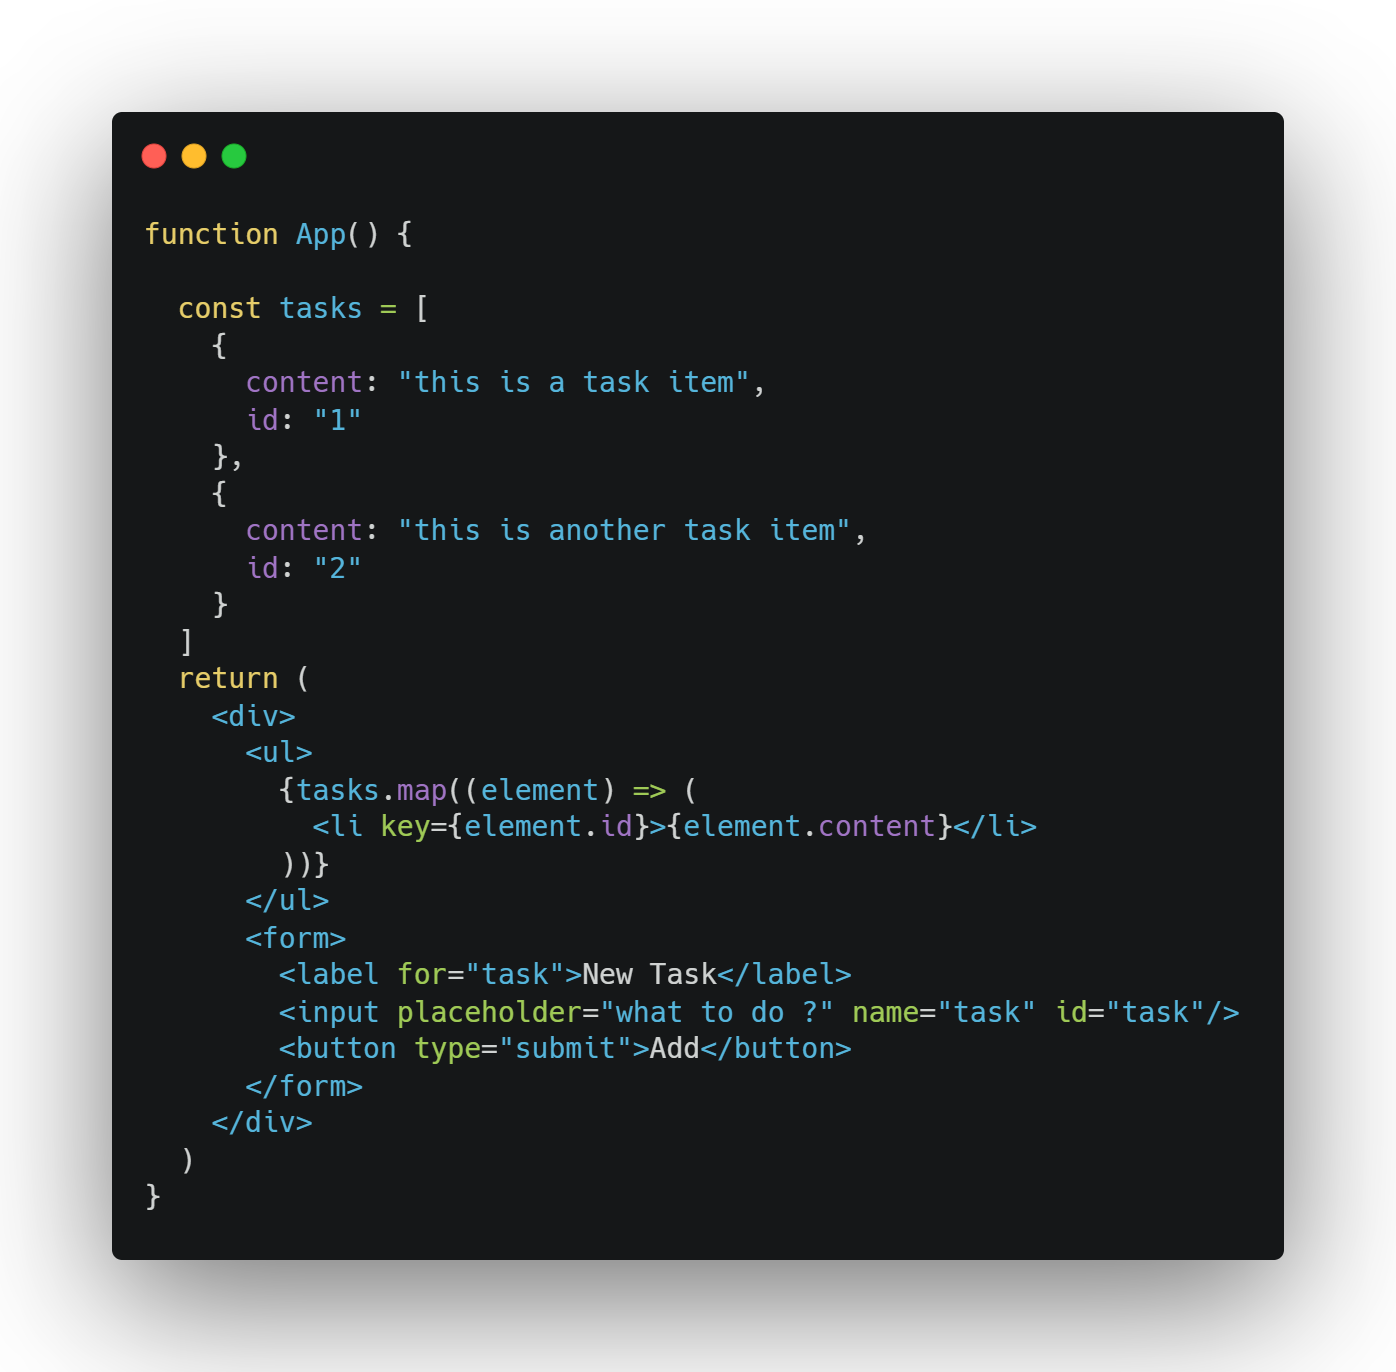\n\nIf you try typing in something and then submitting the form you'll notice something strange... The page reloads! This is because the `form` is acting like a form, in that it sends a post request while reloading the page. But we don't want that, do we?\n\nWhat we need to do is provide a substitute function that will run when the form gets submitted. We can do this with the `onSubmit` prop (think of props as passing values to another component from their parent).\n\nThe first thing we want to do is prevent the form from actually submitting (i.e. reloading the page). For that, we need to prevent the default behaviour associated with the event originating from the form. If this last sentence seems a bit complicated, it's not; we're simply doing this:\n\n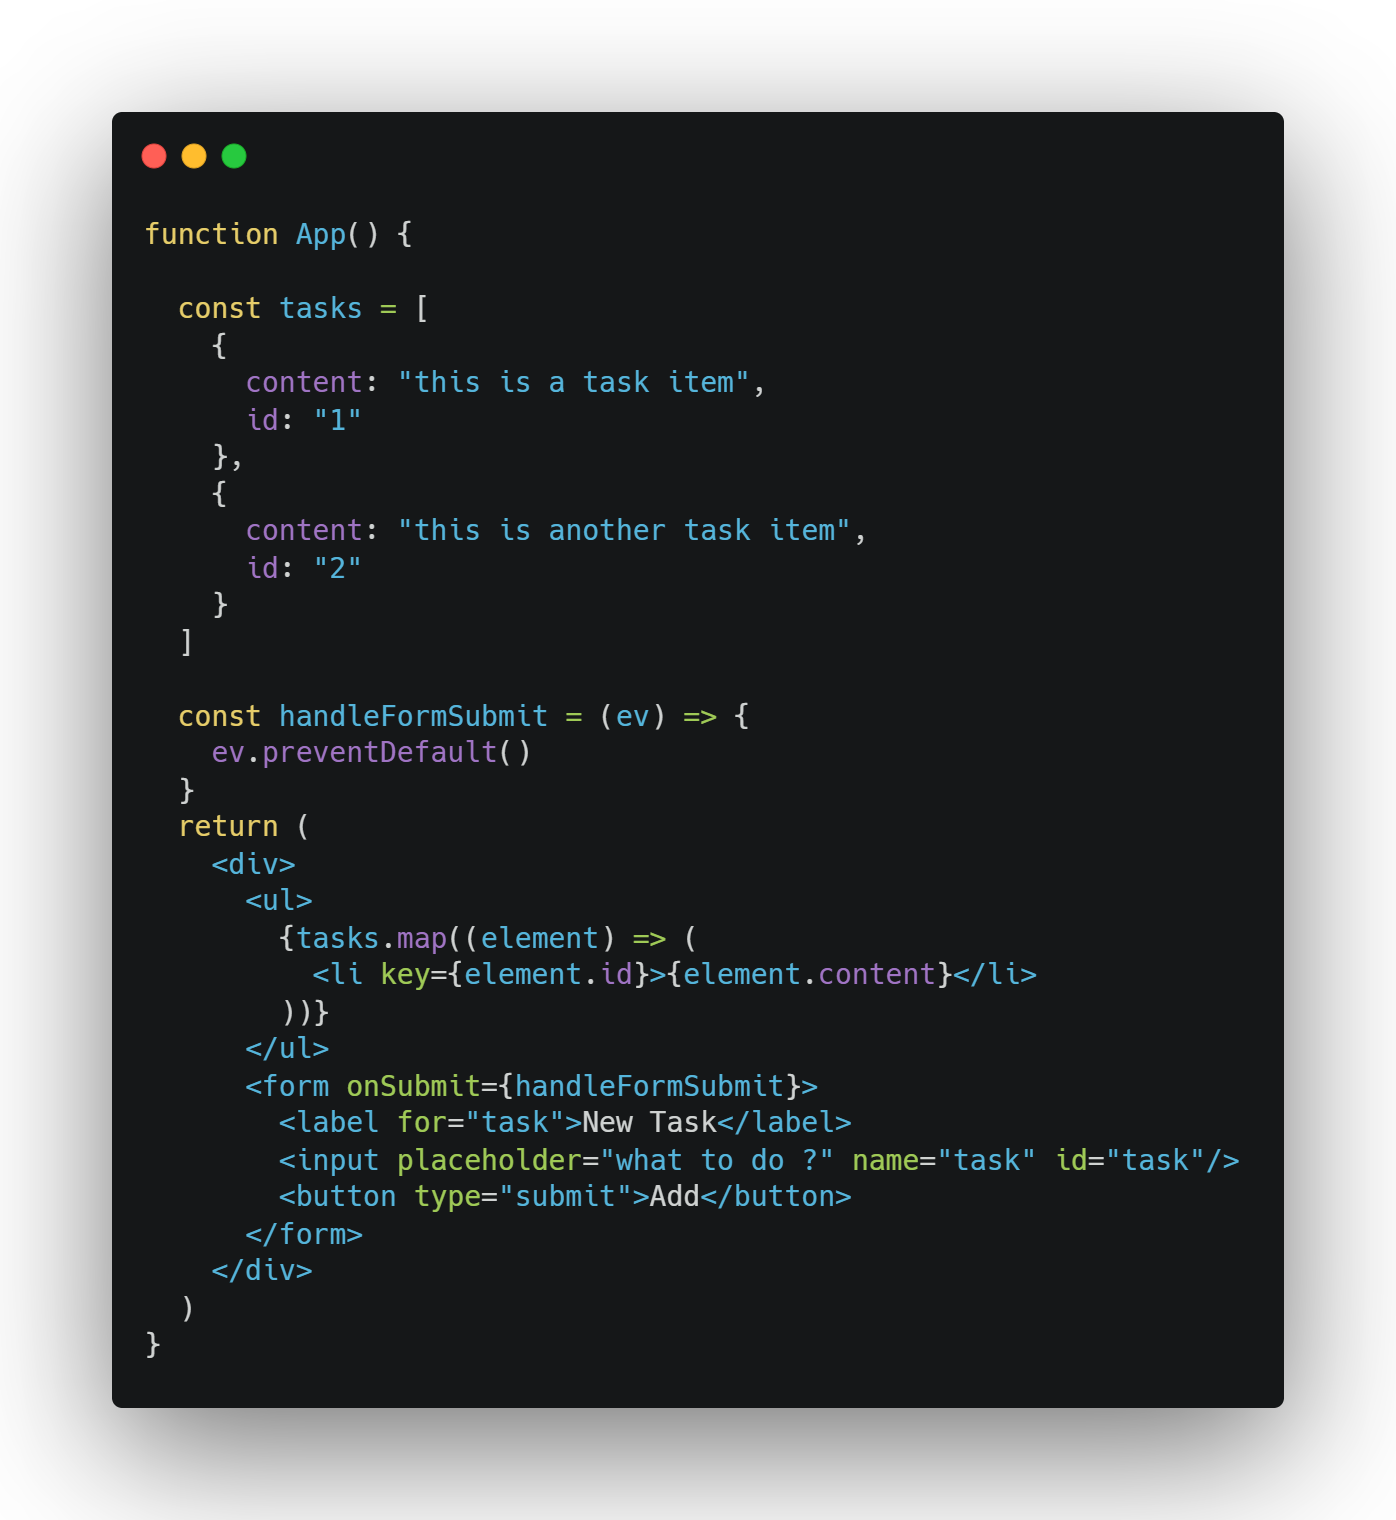\n\nIf you try this out, you'll see that the form doesn't reload the page!\n\n##### Getting the task's name\n\nNow we need to get the input's value in order to add it to the list. And it's in this section that you'll get to meet the **one** thing that I love about React: state!\n\n##### React State\n\nReact state is a collection of variables that you define on a component basis, that forces the component showing them to the screen to re-render itself. It means that for example we can dynamically add rows to a table and it will update automatically (without us needing to manipulate the dom direclty). In order to do so, we'll also get to know a \"new\" concept in React, called hooks (more info [here](https://reactjs.org/docs/hooks-intro.html)). In this paricular guide, we'll only use the `useState` hook, which allows us to define a variable and a function to update said variable. The syntax is as follows:\n\n```js\nconst [value, setValue] = useState()\n\nsetValue(3) // updates the variable value\n```\n\nyou can also pass as an argument to `useState` the default value of the variable\n\nIn our case, we need to keep track of the input's value, and then add it to our table. For the task's id, I'll increment the length of task array by 1.\n\nOur component should look like this, now:\n\n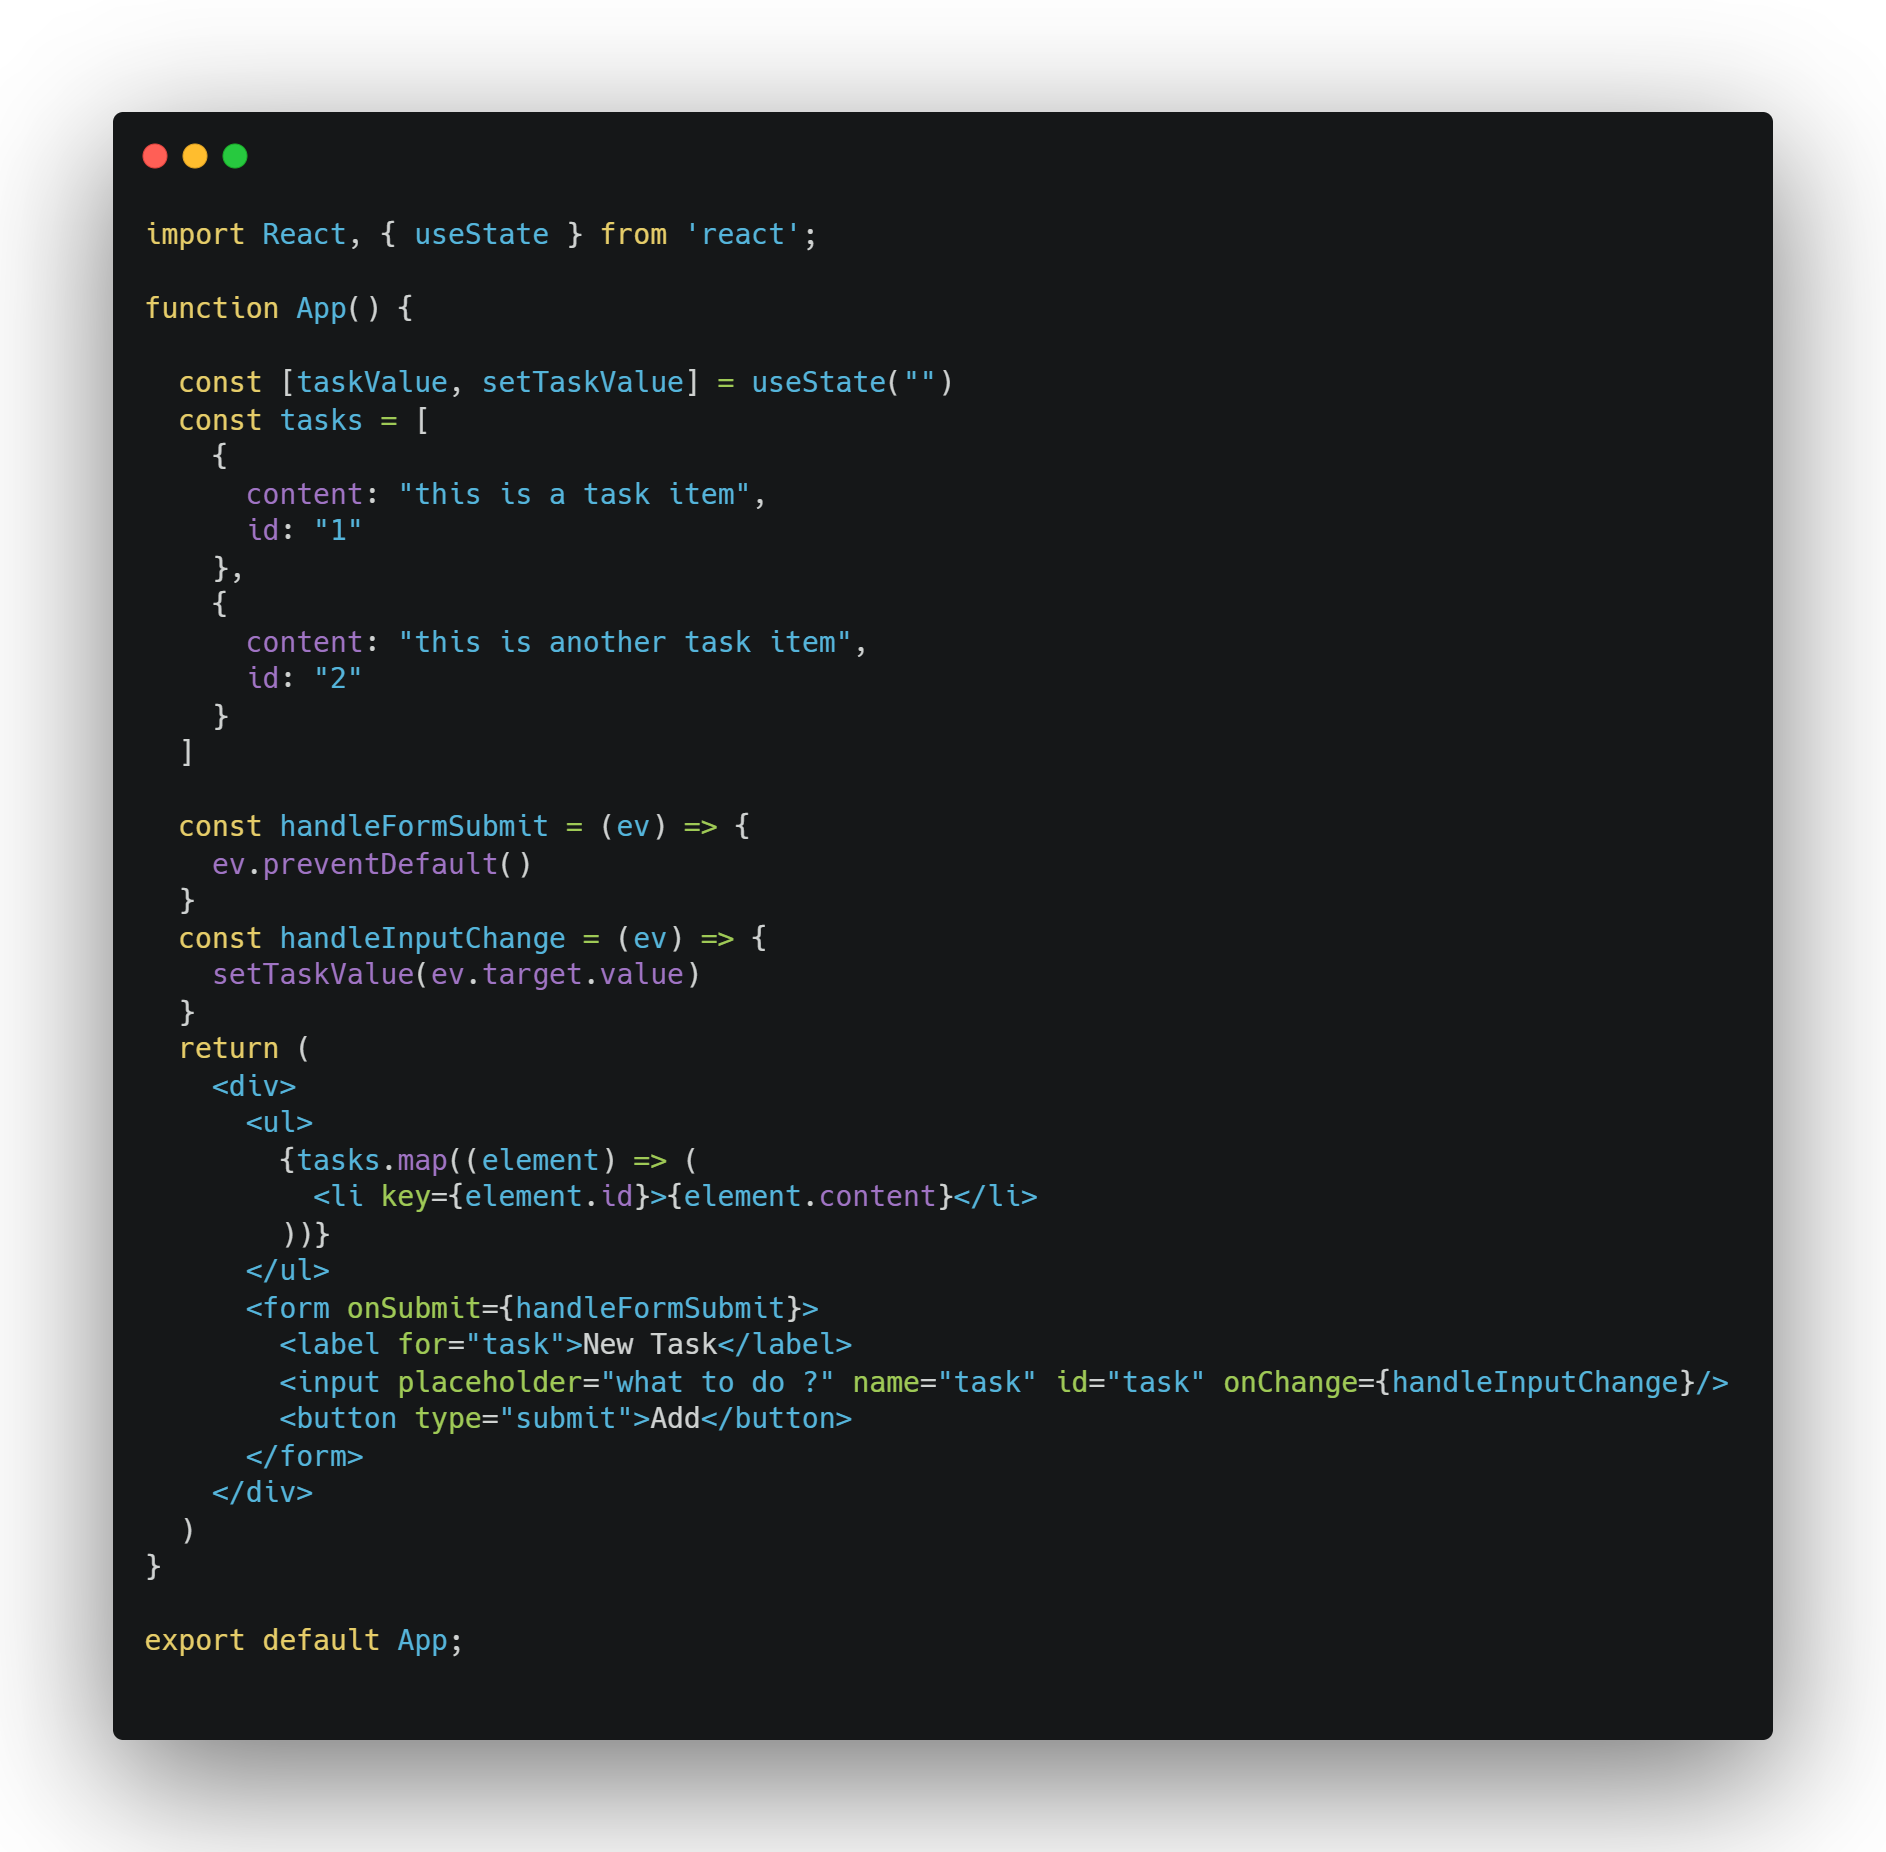\n\nAll that is left is add the `taskValue` variable to our tasks array when the form is submitted:\n\n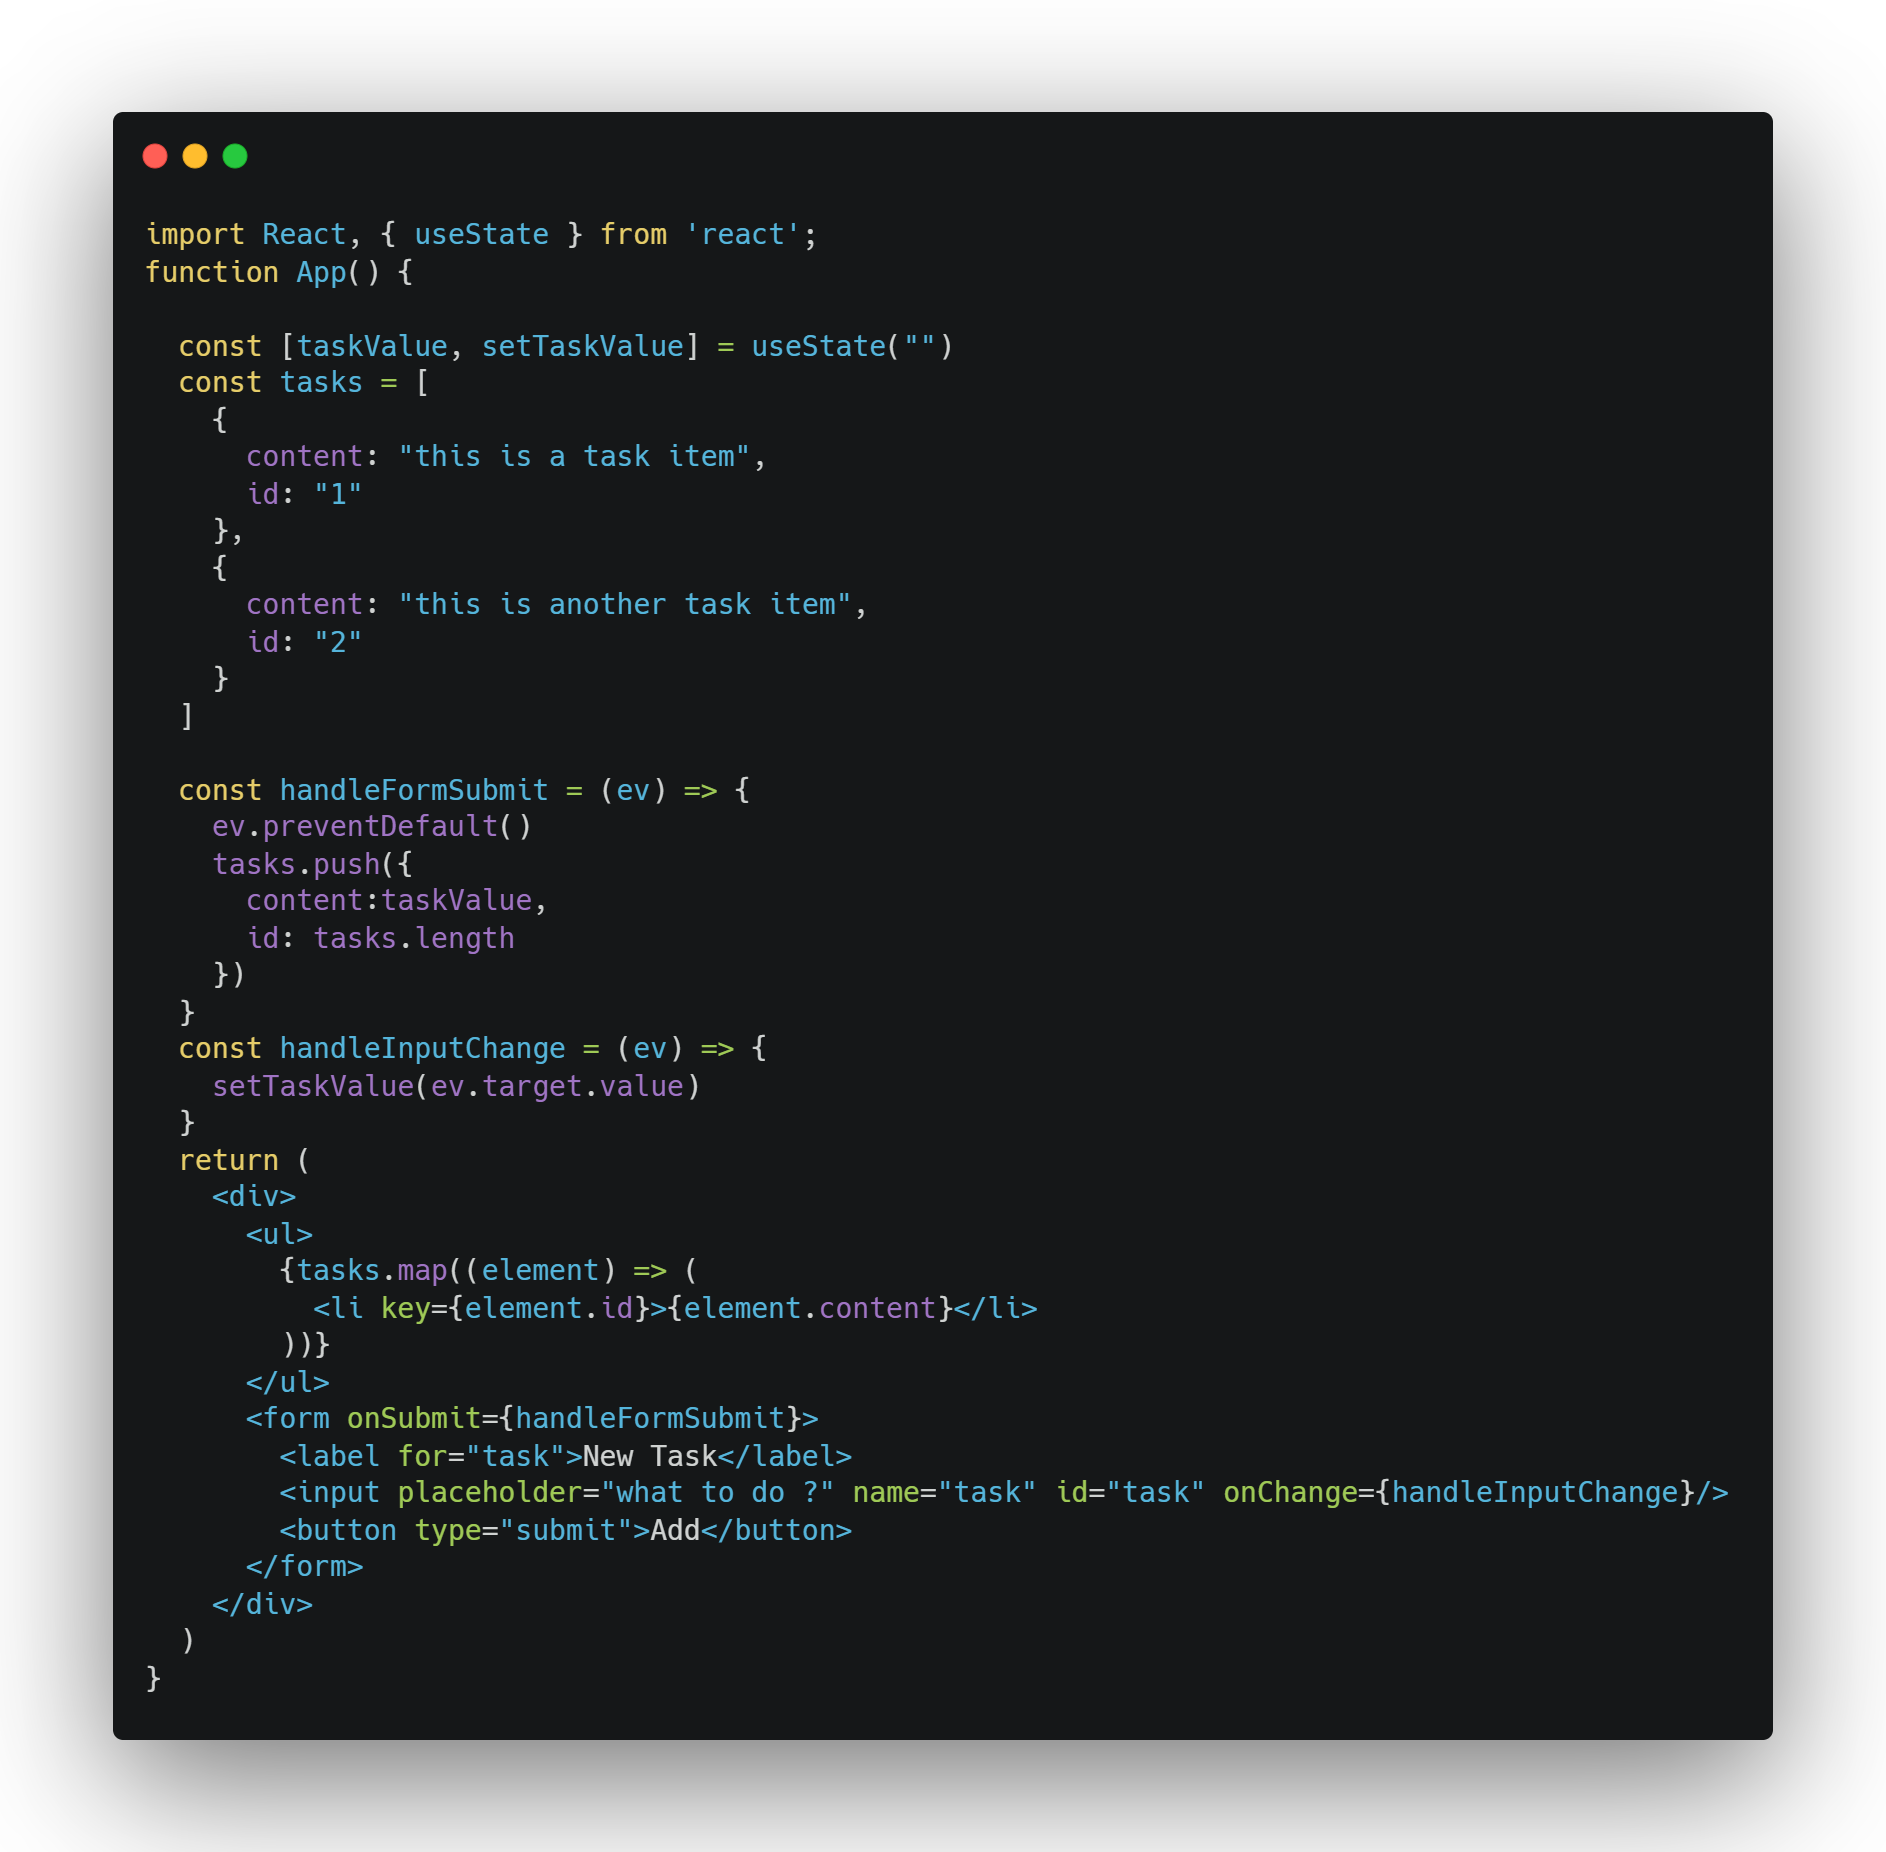\n\nIf you try and run this code, you'll notice that it doesn't really update the table the user sees. Can you guess why ? (hint: the table doesn't really _react_ to changes)\n\n### Conclusion\n\nThanks for reading this article! If you have any questions, feel free to ask them in the comments below.",
"version": "1.0"
},
"path": "/articles/react-for-beginners",
"publishedAt": "2020-08-15T00:00:00.000Z",
"site": "at://did:plc:dgtaz4vldacvqhvvmdvoc4ad/site.standard.publication/3mfbydibiwc7f",
"tags": [
"tutorial",
"introduction",
"javascript",
"reactjs",
"beginners",
"programming"
],
"textContent": "So...\nYou heard of this framework called React and want to know what all the fuss is about ? Well, wander no more ! Let's go for a spin with ReactJS and build a simple application that will let us see why everyone is talking about it.\n\nInstalling React\n\nPrerequisites\n\nBefore installing React, make sure you have a correct development environment. I'm not talking about your IDE (Integrated Development Environment) - though I personally prefer Visual Studio Code, but whether or not you have NodeJS installed on your machine. If you do, that's great 👍! If you don't, I'd suggest using nvm to install the latest LTS (long term support) version; you shouldn't need anything else for this guide.\n\nCreating a Project\n\nNow that we have a recent version on NodeJS, and consequently npm, we can start bootstrapping our new React project. After you get to know better the framework you can have your own starter template, but for today's guide let's just use . To start a new react project, just open up a terminal and type: where is the name of the folder that will be created with your react project in it.\nHere's a trick I found recently : If you insert instead of a folder name ( is the current directory), then the project will be instantiated in the current directory, without creating an addition subfolder.\n\nOnce that is done, you can move to that folder and run to launch the development server. It should open a browser window to localhost:3000 and you should see the starter page.\n\nCongrats ! You have created your first React project\n\nFolder Structure\n\nThis is the usual folder structure generated by create-react-app\n\nLet's now take a look at some particular files:\nsrc/App.js : this is the root component all your application will be rendered inside of. If you look at the code inside it, you will see that it's what you've seen when you launched your application\nsrc/index.js : this is the file that actually renders the component onto the page by attaching it to a with an id of \"root\".\npublic/index.html : the scheleton of the page your React component will live in: in here you can see the I mentioned above\n\nTo Do\n\nNow that we have had a look at how a React project is structured, we can start creating our To Do app.\n\nNB: for the sake of brevity, we will have everything happen inside one component. Perhaps in a following article we will advance this project to make it resemble more a real life use case\n\nTask list\n\nThe first step is to create a list of tasks. This list will be updated every time a new items gets added or an item is removed. It will composed of a simple unordered list, with each list item corresponding to a task.\n\nCreating a component\n\nFor this guide, we will be using functional components and the latest addition to the React arsenal, hooks. To create a functional component you must first import React at the top of the file and create a function that returns some .\n\nWhat is JSX ?\n\nFrom React's official documentation\n\nConsider this variable declaration:\n\nThis funny tag syntax is neither a string nor HTML.\n\nIt is called JSX, and it is a syntax extension to JavaScript. We recommend using it with React to describe what the UI should look like. JSX may remind you of a template language, but it comes with the full power of JavaScript.\n\nYou can learn more here\n\nLet's get back to the 'task' 🤣 at hand\n\nLet's remove all the code inside the return of the component. It should now look like this:\n\nlet's begin by adding a as the root of our component: All React element must have only one root element and inside of it let's add our unordered list\n\nLet's display some taks\n\nNow that we have a list element, we need to add elements inside of it. We could add them one by one, but that is not the point of using React. Let's instead declare an array with some data in it:\n\nNow that we have some data, all that is left is to display them to the user. Let me introduce you to one of your Javascript bestfriends: the map function. It allows us to iterate over an array and return a value for each element (keeping it brief, of course). So, can you guess what we're going to use it for ?\n\n We'll use to display our list items !\n\nso why don't we do just that ?\n\nIf everything went well, then you should see 2 elements appear on your page.\n\nAdding a task\n\nIn order to add a task, we need to introduce a tag. Within the form we'll have an and a . Clicking the button will submit the form.\n\nIf you try typing in something and then submitting the form you'll notice something strange... The page reloads! This is because the is acting like a form, in that it sends a post request while reloading the page. But we don't want that, do we?\n\nWhat we need to do is provide a substitute function that will run when the form gets submitted. We can do this with the prop (think of props as passing values to another component from their parent).\n\nThe first thing we want to do is prevent the form from actually submitting (i.e. reloading the page). For that, we need to prevent the default behaviour associated with the event originating from the form. If this last sentence seems a bit complicated, it's not; we're simply doing this:\n\nIf you try this out, you'll see that the form doesn't reload the page!\n\nGetting the task's name\n\nNow we need to get the input's value in order to add it to the list. And it's in this section that you'll get to meet the one thing that I love about React: state!\n\nReact State\n\nReact state is a collection of variables that you define on a component basis, that forces the component showing them to the screen to re-render itself. It means that for example we can dynamically add rows to a table and it will update automatically (without us needing to manipulate the dom direclty). In order to do so, we'll also get to know a \"new\" concept in React, called hooks (more info here). In this paricular guide, we'll only use the hook, which allows us to define a variable and a function to update said variable. The syntax is as follows:\n\nyou can also pass as an argument to the default value of the variable\n\nIn our case, we need to keep track of the input's value, and then add it to our table. For the task's id, I'll increment the length of task array by 1.\n\nOur component should look like this, now:\n\nAll that is left is add the variable to our tasks array when the form is submitted:\n\nIf you try and run this code, you'll notice that it doesn't really update the table the user sees. Can you guess why ? (hint: the table doesn't really react to changes)\n\nConclusion\n\nThanks for reading this article! If you have any questions, feel free to ask them in the comments below.",
"title": "React for Beginners: Build a To-Do List",
"updatedAt": "2026-05-17T13:09:11.815Z"
}