{
"$type": "site.standard.document",
"content": [
{
"$type": "app.myblog.markdown",
"lang": "ja",
"markdown": "先日、LT大会でルビをSwiftUIで表示するぞ!という発表をしました。 \nそのLTの中で,iOS 18から使えるようになったTextRendererも試してみたよ!でも疲れたからアドベントカレンダーに書くよと書いていたのですが、これがその記事になります。\n\n※この記事は[note株式会社Advent Calendar 2024](https://qiita.com/advent-calendar/2024/note) 12日目の記事です。\n\n## Text Renderer\n\n[**TextRenderer | Apple Developer Documentation** _A value that can replace the default text view rendering beha_ _developer.apple.com_](https://developer.apple.com/documentation/SwiftUI/TextRenderer)[](https://developer.apple.com/documentation/SwiftUI/TextRenderer)\n\nSwiftUI.Textのレンダリングをデフォルトのものから置き換えるために使うものになります。.textRenderer(\\_:)にTextRendererに準拠したstructを渡してあげるとそれを使って描画してくれるようになります。\n\n[**textRenderer(\\_:) | Apple Developer Documentation** _Returns a new view such that any text views within it will us_ _developer.apple.com_](https://developer.apple.com/documentation/swiftui/view/textrenderer\\(_:\\))[](https://developer.apple.com/documentation/swiftui/view/textrenderer\\(_:\\))\n\n## やっていくぞ\n\nまずは、SwiftUIでTextを表示します。Textを使ってメッセージを表示するだけの最小のものです。\n\n```\nstruct ChristmasView: View {\n var body: some View {\n Text(\"Merry Christmas\")\n Text(\"and Happy New Year\")\n }\n}\n\n#Preview {\n ChristmasView()\n}\n```\n\n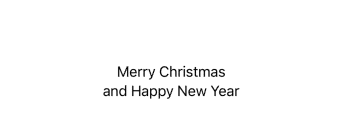\n\n寂しいね\n\n寂しいですね。TextRendererを使ってクリスマスに近づけていきましょう。 \n**func draw(layout: Text.Layout, in ctx: inout GraphicsContext)**を実装することで、文字列の描画ができるようになります。GraphicsContextはCoreGraphicsのSwiftUI Wrapperみたいなものです。\n\n```\nstruct CustomTextRenderer: TextRenderer {\n func draw(layout: Text.Layout, in ctx: inout GraphicsContext) {\n for line in layout {\n ctx.draw(line)\n }\n }\n}\n```\n\n最小限の実装です。Textの情報はText.Layout→Line→Runs→Sliceといった感じで、全体的なレイアウト、段落、行、文字のような感じで分割されて収納されています。が、具体的な文字自体をどうのこうのするではなく、N文字目の文字をどうのこうのするというのがTextRendererの運用になるようです。\n\n```\nstruct ChristmasView: View {\n var body: some View {\n VStack {\n Text(\"Merry Christmas\")\n Text(\"and Happy New Year\")\n }\n .textRenderer(CustomTextRenderer())\n }\n}\n```\n\nVStack にいれてTextRendererをセットしました。表示自体はなにも変わらないのですが,レンダリングがオレオレレンダリングに変わりました。 \nこのように、TextRendererはSwiftUI.Text以外に対してセットできます。セットされた子要素にTextがあれば,描画をのっとって書き換えられます。\n\n## クリスマス\n\nでは、唐突ですがクリスマスっぽくしていきましょう。Claudeにクリスマスっぽいカラーコードを作ってもらいました。\n\n```\nextension Color {\n // クリスマスの基本カラー\n static let christmasRed = Color(red: 170/255, green: 19/255, blue: 19/255)\n static let christmasGreen = Color(red: 34/255, green: 111/255, blue: 84/255)\n static let christmasGold = Color(red: 212/255, green: 175/255, blue: 55/255)\n\n // クリスマスの追加カラー\n static let wreathGreen = Color(red: 21/255, green: 71/255, blue: 52/255)\n static let christmasBurgundy = Color(red: 128/255, green: 0/255, blue: 32/255)\n}\n```\n\n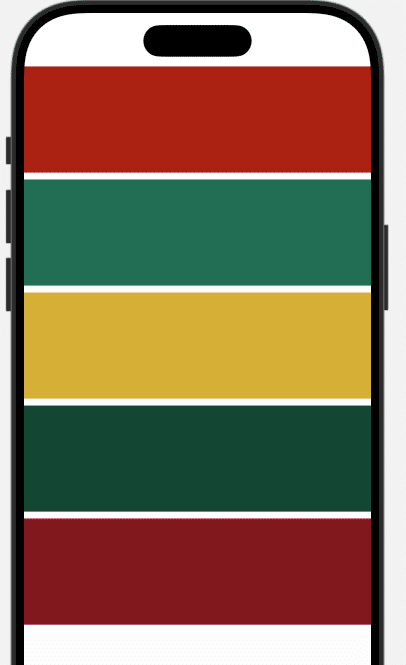\n\nクリスマスっぽいですよね!!\n\nでは、これを文字に適用してみます。一文字ずつカラフルにうるさくしていきたいですね。こういう時にTextRendererは便利です。\n\n```\nstruct ChristmasTextRenderer: TextRenderer {\n let colors: [Color] = [.christmasRed, .christmasGreen, .christmasGold, .wreathGreen, .christmasBurgundy]\n\n func draw(layout: Text.Layout, in ctx: inout GraphicsContext) {\n for line in layout {\n for run in line {\n for (i, slice) in run.enumerated() {\n var copy = ctx\n copy.addFilter(.colorMultiply(colors[i % colors.count]))\n copy.draw(slice)\n }\n }\n }\n }\n}\n\nstruct ChristmasView: View {\n var body: some View {\n VStack {\n Text(\"Merry Christmas\")\n Text(\"and Happy New Year\")\n }\n .kerning(4)\n .fontWeight(.black)\n .foregroundStyle(Color.white)\n .textRenderer(ChristmasTextRenderer())\n }\n}\n```\n\nなお、 注意点が二つあります。\n\n* GraphicsContextはcopyする\n \n * copyしなかった場合、前のループの状態を引き継ぐため、カオスになっていきます\n \n* TextでForegroundをColor.whiteとかにしておく\n \n * もともとのText色の影響を受けるので、whiteにしておくとよいです\n \n\n\n\nカラフルになりました。フォントまわりとかも変えています。\n\n## どんどんいくよ\n\n次に、もっとうるさくしてみようかと思います。 \nアニメーションしてもらいましょう。ボタンをタップすると文字がアニメーションするようにします。 \n細かいところをちょこちょこ変えていますが,ほぼWWDC 24のセッションのコードなので最重要なところだけを書いています。\n\n[**Create custom visual effects with SwiftUI - WWDC24 - Videos - Apple Developer** _Discover how to create stunning visual effects in SwiftUI. Le_ _developer.apple.com_](https://developer.apple.com/videos/play/wwdc2024/10151/?time=550)[](https://developer.apple.com/videos/play/wwdc2024/10151/?time=550)\n\nAnimationにはTransitionを使います。このTransitionも単独で記事にしてすっげーってできるようなものなのですが、さくっと説明もなしに使います。\n\n```\nstruct TextTransition: Transition {\n static var properties: TransitionProperties {\n TransitionProperties(hasMotion: true)\n }\n\n func body(content: Content, phase: TransitionPhase) -> some View {\n let duration = 1.0\n let elapsedTime = phase.isIdentity ? duration : 0\n let renderer = ChristmasTextRenderer(\n elapsedTime: elapsedTime,\n totalDuration: duration\n )\n\n content.transaction { transaction in\n if !transaction.disablesAnimations {\n transaction.animation = .linear(duration: duration)\n }\n } body: { view in\n view.textRenderer(renderer)\n }\n }\n}\n```\n\n \n\n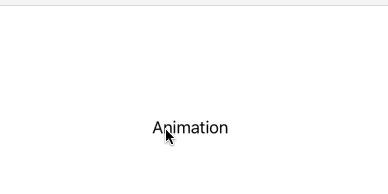\n\nお祭り\n\nさて、Happy New Yearはクリスマス色というよりはお正月色にしたいですね。こういった場合はどう設定すべきでしょうか。\n\n一つのTextには一つのTextRendererしか適用できないようです。 \nここまでのコードでも複数のTextに対して、一つのRendererというコードになっていました。 \nアニメーションするRenderer、文字色を変えるRendererとするのではなく、一つの強いオレオレRendererを作り,それを使うという風になります。実際問題、複数のCanvas操作を別々にやるとかさっぱりわからないですしね。。。\n\niOS17以上対象で,TextAttributeというprotocolも追加されました。\n\n[**TextAttribute | Apple Developer Documentation** _A value that you can attach to text views and that text rende_ _developer.apple.com_](https://developer.apple.com/documentation/swiftui/textattribute)[](https://developer.apple.com/documentation/swiftui/textattribute)\n\nStringAttributeのようなかんじで、Textに対してAttributeを設定できるものになります。Text全体にセットされてしまうので、範囲を区切る場合は工夫が必要そうです。 \nこれまで雑に全体をわちゃわちゃさせていたのですが,これでわちゃわちゃさせる部分を指定出来るようになります。 \n\n```\nstruct ChristmasAttribute: TextAttribute {}\nstruct AnimationAttribute: TextAttribute {}\nstruct NewyearAttribute: TextAttribute {}\n```\n\nAnimationさせたいTextにはAnimationAttributeを、クリスマス色、正月色にする場所にはそれぞれのAttributeをセットします。\n\n```\nVStack {\n Text(\"Merry Christmas\")\n .customAttribute(ChristmasAttribute())\n .customAttribute(AnimationAttribute())\n Text(\"and Happy New Year\")\n .customAttribute(AnimationAttribute())\n .customAttribute(NewyearAttribute())\n}\nButton { isVisible.toggle() } label: {\n Text(\"Animation\")\n .customAttribute(ChristmasAttribute())\n}\n```\n\nTextRendererの中で\n\n```\nif slice[AnimationAttribute.self] != nil {\n}\n```\n\nといったコードでAttributeがセットされているかを確認できます。なので、色を変えるFilterの追加やアニメーションの処理などはこの中にいれていく感じになります。Animationボタンも含めて、TextRendererで装飾してみました。\n\n\n\nMerry Christmas and Happy New Year\n\nよいお年をお迎えください。\n\n \n\n \n\n \n\n \n\n* * *\n\nちなみに、ルビの表示もできまして、こちらにはちょっと工夫が必要になります。ルビの文字数>ベースの文字数となった場合の隙間のあつかいですね。 \nいいかんじに割り付けてあげる必要があります。 \n上で求めた、フレームサイズはフレームサイズであり部分的な文字のサイズとかではありません。そこを調整してあげる必要があるのですが、TextRendererだけでがんばることが出来ませんでした。\n\n方針としては、Textに対してtrackingやText(\" \")をあいだにつっこんだりして、文字の余白を調整します。 \nそして、Rendererで文字の上に小さなフォントサイズでルビを別途印字する。そのさい、余白等は事前に準備しているので、Rendererは知らなくてもなんとかなる。みたいな感じになります。\n\n```\nstruct RubyAttributes: Hashable {\n let text: String\n let font: Font\n let tracking: CGFloat\n let verticalOffset: CGFloat?\n\n init(text: String, font: Font, tracking: CGFloat = 0, verticalOffset: CGFloat? = nil) {\n self.text = text\n self.font = font\n self.tracking = tracking\n self.verticalOffset = verticalOffset\n }\n}\n\n/// ルビ\nstruct RubyAttributeKey: TextAttribute {\n static let name = \"RubyAnnotation\"\n let attributes: RubyAttributes\n}\n\n\n// Runとかから↑Structが帰ってきています。\nif let attribute = run[RubyAttributeKey.self] {\n // Ruby情報を使って描画\n} \n```\n\n```\nextension CustomTextRenderer {\n private func drawRubyAnnotations(for line: Text.Layout.Line, in ctx: inout GraphicsContext) {\n for run in line {\n guard let attribute = run[RubyAttributeKey.self] else { continue }\n let rubyText = createRubyText(with: attribute.attributes)\n let resolvedText = ctx.resolve(rubyText)\n let rect = calculateRubyRect(for: run, resolvedText: resolvedText, tracking: attribute.attributes.tracking, verticalOffset: attribute.attributes.verticalOffset)\n ctx.draw(resolvedText, in: rect)\n }\n }\n\n private func createRubyText(with attributes: RubyAttributes) -> Text {\n Text(attributes.text).font(attributes.font)\n }\n\n private func calculateRubyRect(for run: Text.Layout.Run, resolvedText: GraphicsContext.ResolvedText, tracking: CGFloat, verticalOffset: CGFloat?) -> CGRect {\n let textSize = resolvedText.measure(in: CGSize(width: .max, height: .max))\n let x = if textSize.width < run.typographicBounds.rect.width {\n run.typographicBounds.rect.midX - (textSize.width / 2)\n } else {\n run.typographicBounds.origin.x - tracking\n }\n return CGRect(\n x: x,\n y: run.typographicBounds.rect.minY - (textSize.height * (verticalOffset ?? 1.1)),\n width: textSize.width,\n height: textSize.height\n )\n }\n}\n```\n\nTextAttributeをセットするとText型ではなくなるというなんでだ!っていう動作もあるんですが、TextとTextAttributeを組み合わせて装飾を変えていけるというのは、AttributedStringとぶつかるところがある気もします。 \nSwiftUIでの文字装飾が今後どうなっていくのか気になります。\n\nフレームサイズと描画の座標をごにょごにょすると縦書き風もできますが、句読点の位置や括弧類とかなどでうーん :thinking\\_face: みたいな感じになりました。 \nNSAttributedStringでは縦書きattributeがdeprecatedなのでなんとかならないかな後思ったのですがだめでした。\n"
}
],
"path": "/blog/3mmcuymbbleet",
"publishedAt": "2024-12-12T00:00:00Z",
"site": "https://wtr.app",
"tags": [
"note"
],
"textContent": "先日、LT大会でルビをSwiftUIで表示するぞ!という発表をしました。そのLTの中で,iOS 18から使えるようになったTextRendererも試してみたよ!でも疲れたからアドベントカレンダーに書くよと書いていたのですが、これがその記事になります。\n\n※この記事はnote株式会社Advent Calendar 2024 12日目の記事です。\n\nText Renderer\n\nTextRenderer | Apple Developer Documentation A value that can replace the default text view rendering beha developer.apple.com\n\nSwiftUI.Textのレンダリングをデフォルトのものから置き換えるために使うものになります。.textRenderer(\\_:)にTextRendererに準拠したstructを渡してあげるとそれを使って描画してくれるようになります。\n\ntextRenderer(\\_:) | Apple Developer Documentation Returns a new view such that any text views within it will us developer.apple.com\n\nやっていくぞ\n\nまずは、SwiftUIでTextを表示します。Textを使ってメッセージを表示するだけの最小のものです。\n\nstruct ChristmasView: View {\n var body: some View {\n Text(\"Merry Christmas\")\n Text(\"and Happy New Year\")\n }\n}\n\n#Preview {\n ChristmasView()\n}\n\n寂しいね\n\n寂しいですね。TextRendererを使ってクリスマスに近づけていきましょう。**func draw(layout: Text.Layout, in ctx: inout GraphicsContext)**を実装することで、文字列の描画ができるようになります。GraphicsContextはCoreGraphicsのSwiftUI Wrapperみたいなものです。\n\nstruct CustomTextRenderer: TextRenderer {\n func draw(layout: Text.Layout, in ctx: inout GraphicsContext) {\n for line in layout {\n ctx.draw(line)\n }\n }\n}\n\n最小限の実装です。Textの情報はText.Layout→Line→Runs→Sliceといった感じで、全体的なレイアウト、段落、行、文字のような感じで分割されて収納されています。が、具体的な文字自体をどうのこうのするではなく、N文字目の文字をどうのこうのするというのがTextRendererの運用になるようです。\n\nstruct ChristmasView: View {\n var body: some View {\n VStack {\n Text(\"Merry Christmas\")\n Text(\"and Happy New Year\")\n }\n .textRenderer(CustomTextRenderer())\n }\n}\n\nVStack にいれてTextRendererをセットしました。表示自体はなにも変わらないのですが,レンダリングがオレオレレンダリングに変わりました。このように、TextRendererはSwiftUI.Text以外に対してセットできます。セットされた子要素にTextがあれば,描画をのっとって書き換えられます。\n\nクリスマス\n\nでは、唐突ですがクリスマスっぽくしていきましょう。Claudeにクリスマスっぽいカラーコードを作ってもらいました。\n\nextension Color {\n // クリスマスの基本カラー\n static let christmasRed = Color(red: 170/255, green: 19/255, blue: 19/255)\n static let christmasGreen = Color(red: 34/255, green: 111/255, blue: 84/255)\n static let christmasGold = Color(red: 212/255, green: 175/255, blue: 55/255)\n\n // クリスマスの追加カラー\n static let wreathGreen = Color(red: 21/255, green: 71/255, blue: 52/255)\n static let christmasBurgundy = Color(red: 128/255, green: 0/255, blue: 32/255)\n}\n\nクリスマスっぽいですよね!!\n\nでは、これを文字に適用してみます。一文字ずつカラフルにうるさくしていきたいですね。こういう時にTextRendererは便利です。\n\nstruct ChristmasTextRenderer: TextRenderer {\n let colors: [Color] = [.christmasRed, .christmasGreen, .christmasGold, .wreathGreen, .christmasBurgundy]\n\n func draw(layout: Text.Layout, in ctx: inout GraphicsContext) {\n for line in layout {\n for run in line {\n for (i, slice) in run.enumerated() {\n var copy = ctx\n copy.addFilter(.colorMultiply(colors[i % colors.count]))\n copy.draw(slice)\n }\n }\n }\n }\n}\n\nstruct ChristmasView: View {\n var body: some View {\n VStack {\n Text(\"Merry Christmas\")\n Text(\"and Happy New Year\")\n }\n .kerning(4)\n .fontWeight(.black)\n .foregroundStyle(Color.white)\n .textRenderer(ChristmasTextRenderer())\n }\n}\n\nなお、 注意点が二つあります。\n\nGraphicsContextはcopyする\n\ncopyしなかった場合、前のループの状態を引き継ぐため、カオスになっていきます\n\nTextでForegroundをColor.whiteとかにしておく\n\nもともとのText色の影響を受けるので、whiteにしておくとよいです\n\nカラフルになりました。フォントまわりとかも変えています。\n\nどんどんいくよ\n\n次に、もっとうるさくしてみようかと思います。アニメーションしてもらいましょう。ボタンをタップすると文字がアニメーションするようにします。細かいところをちょこちょこ変えていますが,ほぼWWDC 24のセッションのコードなので最重要なところだけを書いています。\n\nCreate custom visual effects with SwiftUI - WWDC24 - Videos - Apple Developer Discover how to create stunning visual effects in SwiftUI. Le developer.apple.com\n\nAnimationにはTransitionを使います。このTransitionも単独で記事にしてすっげーってできるようなものなのですが、さくっと説明もなしに使います。\n\nstruct TextTransition: Transition {\n static var properties: TransitionProperties {\n TransitionProperties(hasMotion: true)\n }\n\n func body(content: Content, phase: TransitionPhase) -> some View {\n let duration = 1.0\n let elapsedTime = phase.isIdentity ? duration : 0\n let renderer = ChristmasTextRenderer(\n elapsedTime: elapsedTime,\n totalDuration: duration\n )\n\n content.transaction { transaction in\n if !transaction.disablesAnimations {\n transaction.animation = .linear(duration: duration)\n }\n } body: { view in\n view.textRenderer(renderer)\n }\n }\n}\n\nお祭り\n\nさて、Happy New Yearはクリスマス色というよりはお正月色にしたいですね。こういった場合はどう設定すべきでしょうか。\n\n一つのTextには一つのTextRendererしか適用できないようです。ここまでのコードでも複数のTextに対して、一つのRendererというコードになっていました。アニメーションするRenderer、文字色を変えるRendererとするのではなく、一つの強いオレオレRendererを作り,それを使うという風になります。実際問題、複数のCanvas操作を別々にやるとかさっぱりわからないですしね。。。\n\niOS17以上対象で,TextAttributeというprotocolも追加されました。\n\nTextAttribute | Apple Developer Documentation A value that you can attach to text views and that text rende developer.apple.com\n\nStringAttributeのようなかんじで、Textに対してAttributeを設定できるものになります。Text全体にセットされてしまうので、範囲を区切る場合は工夫が必要そうです。これまで雑に全体をわちゃわちゃさせていたのですが,これでわちゃわちゃさせる部分を指定出来るようになります。 \n\nstruct ChristmasAttribute: TextAttribute {}\nstruct AnimationAttribute: TextAttribute {}\nstruct NewyearAttribute: TextAttribute {}\n\nAnimationさせたいTextにはAnimationAttributeを、クリスマス色、正月色にする場所にはそれぞれのAttributeをセットします。\n\nVStack {\n Text(\"Merry Christmas\")\n .customAttribute(ChristmasAttribute())\n .customAttribute(AnimationAttribute())\n Text(\"and Happy New Year\")\n .customAttribute(AnimationAttribute())\n .customAttribute(NewyearAttribute())\n}\nButton { isVisible.toggle() } label: {\n Text(\"Animation\")\n .customAttribute(ChristmasAttribute())\n}\n\nTextRendererの中で\n\nif slice[AnimationAttribute.self] != nil {\n}\n\nといったコードでAttributeがセットされているかを確認できます。なので、色を変えるFilterの追加やアニメーションの処理などはこの中にいれていく感じになります。Animationボタンも含めて、TextRendererで装飾してみました。\n\nMerry Christmas and Happy New Year\n\nよいお年をお迎えください。\n\nちなみに、ルビの表示もできまして、こちらにはちょっと工夫が必要になります。ルビの文字数>ベースの文字数となった場合の隙間のあつかいですね。いいかんじに割り付けてあげる必要があります。上で求めた、フレームサイズはフレームサイズであり部分的な文字のサイズとかではありません。そこを調整してあげる必要があるのですが、TextRendererだけでがんばることが出来ませんでした。\n\n方針としては、Textに対してtrackingやText(\" \")をあいだにつっこんだりして、文字の余白を調整します。そして、Rendererで文字の上に小さなフォントサイズでルビを別途印字する。そのさい、余白等は事前に準備しているので、Rendererは知らなくてもなんとかなる。みたいな感じになります。\n\nstruct RubyAttributes: Hashable {\n let text: String\n let font: Font\n let tracking: CGFloat\n let verticalOffset: CGFloat?\n\n init(text: String, font: Font, tracking: CGFloat = 0, verticalOffset: CGFloat? = nil) {\n self.text = text\n self.font = font\n self.tracking = tracking\n self.verticalOffset = verticalOffset\n }\n}\n\n/// ルビ\nstruct RubyAttributeKey: TextAttribute {\n static let name = \"RubyAnnotation\"\n let attributes: RubyAttributes\n}\n\n// Runとかから↑Structが帰ってきています。\nif let attribute = run[RubyAttributeKey.self] {\n // Ruby情報を使って描画\n} \n\nextension CustomTextRenderer {\n private func drawRubyAnnotations(for line: Text.Layout.Line, in ctx: inout GraphicsContext) {\n for run in line {\n guard let attribute = run[RubyAttributeKey.self] else { continue }\n let rubyText = createRubyText(with: attribute.attributes)\n let resolvedText = ctx.resolve(rubyText)\n let rect = calculateRubyRect(for: run, resolvedText: resolvedText, tracking: attribute.attributes.tracking, verticalOffset: attribute.attributes.verticalOffset)\n ctx.draw(resolvedText, in: rect)\n }\n }\n\n private func createRubyText(with attributes: RubyAttributes) -> Text {\n Text(attributes.text).font(attributes.font)\n }\n\n private func calculateRubyRect(for run: Text.Layout.Run, resolvedText: GraphicsContext.ResolvedText, tracking: CGFloat, verticalOffset: CGFloat?) -> CGRect {\n let textSize = resolvedText.measure(in: CGSize(width: .max, height: .max))\n let x = if textSize.width < run.typographicBounds.rect.width {\n run.typographicBounds.rect.midX - (textSize.width / 2)\n } else {\n run.typographicBounds.origin.x - tracking\n }\n return CGRect(\n x: x,\n y: run.typographicBounds.rect.minY - (textSize.height * (verticalOffset ?? 1.1)),\n width: textSize.width,\n height: textSize.height\n )\n }\n}\n\nTextAttributeをセットするとText型ではなくなるというなんでだ!っていう動作もあるんですが、TextとTextAttributeを組み合わせて装飾を変えていけるというのは、AttributedStringとぶつかるところがある気もします。SwiftUIでの文字装飾が今後どうなっていくのか気になります。\n\nフレームサイズと描画の座標をごにょごにょすると縦書き風もできますが、句読点の位置や括弧類とかなどでうーん :thinking\\_face: みたいな感じになりました。NSAttributedStringでは縦書きattributeがdeprecatedなのでなんとかならないかな後思ったのですがだめでした。",
"title": "SwiftUI TextRenderer",
"updatedAt": "2026-05-20T21:47:14Z"
}